A curbless shower looks simple because there is no raised threshold to step over. In reality, removing that curb makes waterproofing and drainage more demanding.
With a traditional shower curb, the raised threshold helps contain water inside the shower area. A curbless shower removes that physical barrier, so the waterproofing system, floor slope, drain location, and transition between the shower and bathroom floor all have to work together.
This is especially important in a wood-framed home. The shower floor may need to be recessed or otherwise constructed to create the necessary slope without creating an awkward step between the bathroom floor and shower.
After working through bathroom renovation details, I have found that the best curbless shower waterproofing approach is not simply choosing a “waterproof membrane.” The better approach is to build a continuous waterproofing and drainage system that treats the shower floor, walls, drain, corners, penetrations, and bathroom-floor transition as one assembly.
Quick Answer: What Is the Best Waterproofing Approach for a Curbless Shower?
For most curbless showers, the best approach is a complete waterproofing system with continuous floor and wall protection, properly integrated with the shower drain and extending across the entire wet area and critical transition zones.
A sheet membrane, liquid-applied membrane, or compatible waterproof shower board system can all work when installed correctly. The choice should be based on the shower design, substrate, drain system, manufacturer’s requirements, and installer experience.
The most important details are:
- Continuous waterproofing beneath the shower floor and walls
- Correct shower floor slope toward the drain
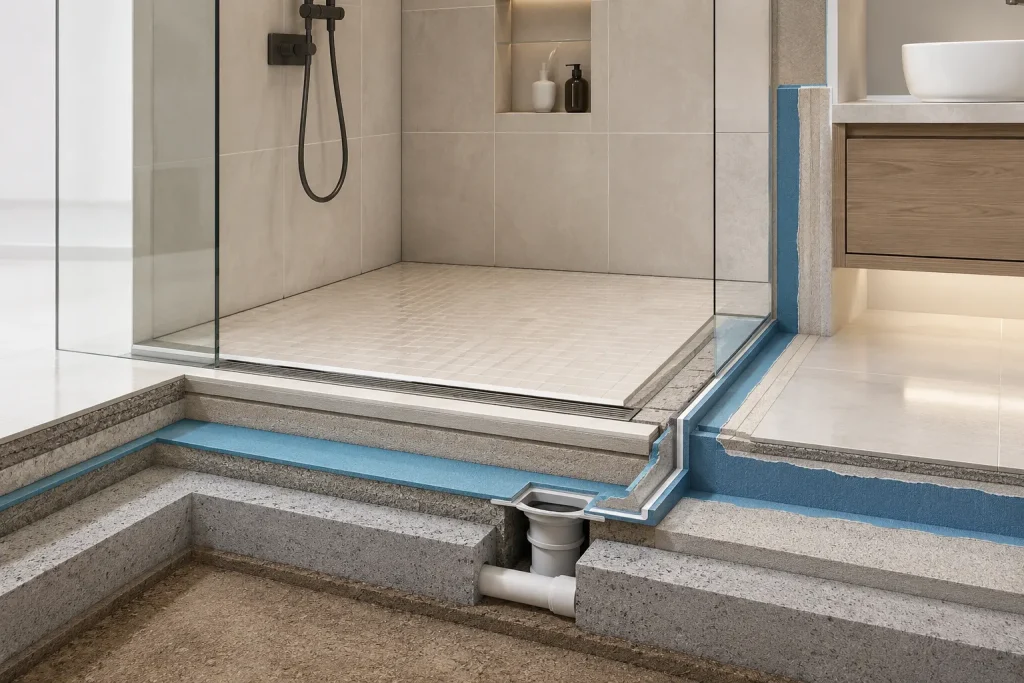
- Proper drain-to-membrane integration
- Waterproofing at corners and changes of plane
- Properly sealed pipe penetrations
- A carefully waterproofed curbless transition
- A substrate capable of supporting the finished assembly
- Appropriate water testing before the tile is installed
The biggest mistake is treating the curbless shower as a normal bathroom floor with a drain added to it. It needs to be designed as a controlled wet area.
Why Is Waterproofing a Curbless Shower More Difficult?
The basic challenge is containment.
In a conventional shower, the curb creates a physical boundary. In a curbless shower, the finished bathroom floor and shower floor can be nearly level with each other.
That means water can potentially travel outside the shower if the floor slope, drain capacity, shower spray pattern, or waterproofing transition is poorly designed.
There are really two separate jobs:
- Drainage: move water toward the drain efficiently.
- Waterproofing: prevent water from reaching the structural floor and surrounding materials.
A waterproof membrane cannot compensate for poor drainage, and a properly sloped floor cannot compensate for a failed waterproofing system.
The Best Curbless Shower Waterproofing Systems
| Approach | Installation | Best Feature | Potential Drawback | Best Use |
|---|---|---|---|---|
| Sheet membrane | Moderate | Consistent membrane thickness | Seams require careful detailing | Complete tiled shower systems |
| Liquid-applied membrane | Moderate | Easy detailing around irregular shapes | Thickness depends on application | Complex layouts |
| Waterproof shower board system | Moderate | Integrated wall and shower construction | Joints and penetrations still require detailing | New shower construction |
| Traditional mortar-bed system | High | Flexible custom construction | More installation skill required | Experienced installers |
There is no universal winner between sheet and liquid membranes. A professionally installed complete system can perform well with either approach.
My preference for a curbless shower is to use a complete manufacturer’s system rather than mixing unrelated membranes, drains, adhesives, sealants, and accessories.
1. Create Continuous Waterproofing Across the Shower Floor
The waterproofing layer should form a continuous barrier beneath the finished shower surface.
This is especially important in a curbless design because the shower floor does not have a raised curb to contain water.
The membrane needs to be integrated with the rest of the shower waterproofing rather than stopping at an arbitrary line near the shower entrance.
Depending on the specific system, waterproofing may extend beyond the shower floor into the surrounding bathroom floor to create a properly detailed transition.
The exact extent should follow the design, applicable requirements, and manufacturer’s system instructions.
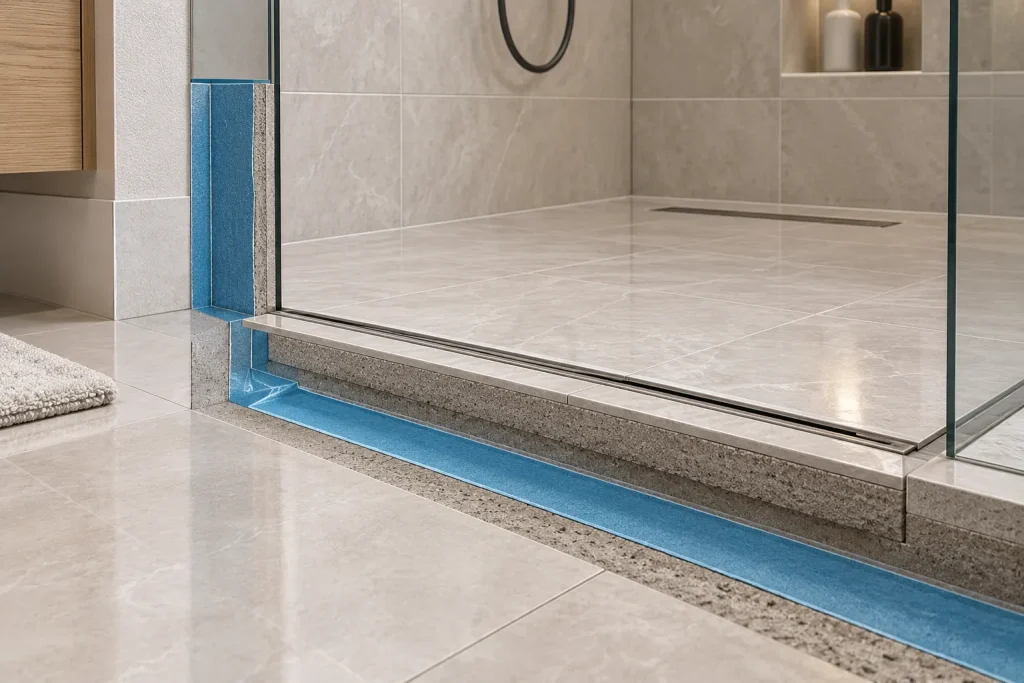
2. Pay Special Attention to the Curbless Transition
This is one of the areas I would inspect most carefully.
A traditional shower has a curb that creates an obvious waterproofing transition. A curbless shower does not.
The waterproofing must transition between the shower floor and the bathroom floor without creating a weak point.
This becomes even more important when the bathroom floor is wood-framed.
If the shower floor is recessed into the structure, the framing and subfloor modifications need to be properly designed. If the floor is not recessed, the shower assembly may need another method of achieving the required slope while keeping the finished transition as close to level as practical.
3. Get the Shower Floor Slope Right
Waterproofing and slope are inseparable in a curbless shower.
The finished shower floor needs to direct water toward the drain rather than allowing water to migrate toward the bathroom entrance.
A commonly used planning value for shower drainage is approximately 1/4 inch of fall per foot, but the exact requirements can depend on the applicable code, shower configuration, drain design, and manufacturer instructions.
For example, a 4-foot run at 1/4 inch per foot represents approximately 1 inch of vertical fall.
That sounds simple until you try to create that slope while keeping a curbless entrance nearly flush with the bathroom floor.
This is why the drain location should be planned before the shower floor is constructed.
4. Choose the Drain Before Building the Shower Floor
One mistake I see in bathroom planning is choosing the drain as an afterthought.
For a curbless shower, the drain affects the floor slope, tile layout, waterproofing details, and sometimes the required floor depth.
A linear drain can be attractive for curbless designs because it can allow the floor to slope primarily in one direction.
A center drain generally requires the floor to slope toward a central point, which can create multiple planes.
| Drain Type | Floor Slope | Tile Layout | Curbless Suitability |
|---|---|---|---|
| Linear drain | Typically one-directional slope | Works well with larger-format layouts | Excellent for many designs |
| Center point drain | Multiple slopes toward center | Often favors smaller tile | Good when properly designed |
| Wall-adjacent linear drain | Single-direction slope | Clean visual transition | Excellent when system is properly installed |
Neither drain type is automatically better. The important thing is that the drain, slope, waterproofing, and tile assembly are designed together.
5. Waterproof the Shower Walls as Part of the Same System
Waterproofing the floor while treating the walls separately defeats the purpose of creating a continuous wet-area assembly.
Water from a shower does not stay neatly on the floor. It reaches walls, corners, niches, plumbing penetrations, and the area around the shower controls.
A reliable shower waterproofing system should therefore address:
- Shower floor
- Shower walls
- Inside corners
- Changes of plane
- Shower niches
- Valve penetrations
- Showerhead penetration
- Drain connection
- Curbless floor transition
Waterproofing is only as strong as its weakest transition.
6. Use a Properly Integrated Waterproof Shower Drain
The drain is not simply a hole in the floor.
The waterproofing membrane needs to connect to the drain assembly in a way that prevents water from bypassing the membrane.
This is particularly important with curbless showers because the drain may be positioned close to a wall or directly at the edge of the wet area.
The drain system should be compatible with the selected waterproofing system.
I would avoid mixing components simply because each individual product appears to be high quality. Compatibility matters more than collecting premium products from several different systems.
7. Waterproof Around Every Penetration
Pipe penetrations are small, but they are disproportionately important.
Every opening through the waterproofing layer creates a potential pathway for water.
Typical shower penetrations include:
- Shower valve
- Showerhead arm
- Handheld shower connection
- Body sprays
- Bench supports
- Grab bars
- Glass enclosure hardware
Do not assume that a decorative trim plate automatically creates a waterproof seal.
Penetrations should be treated according to the waterproofing system and the fixture manufacturer’s requirements.
8. Be Careful With Glass Enclosure Hardware
This is an easy detail to overlook because the glass enclosure is normally installed after the tile is finished.
But drilling into a tiled shower wall can penetrate the waterproofing layer underneath.
In a curbless shower, where the waterproofing transition is already critical, uncontrolled penetrations can create unnecessary risk.
Before drilling for shower glass, shelves, grab bars, or other fixtures, identify where the waterproofing layer is located and use an approved method for sealing the penetration.
Sheet Membrane vs. Liquid Membrane for a Curbless Shower
Both systems can be effective. The real difference is how they are installed and detailed.
Sheet Membrane
A sheet membrane provides a factory-manufactured waterproofing layer. The installer positions the membrane over the approved substrate and treats the seams according to the system requirements.
Advantages:
- Consistent manufactured thickness
- Fast coverage of large areas
- Well suited to complete shower systems
- Easy to identify the physical waterproofing layer during construction
Disadvantages:
- Seams require careful installation
- Complex corners require additional detailing
- Incorrect bonding can compromise the system
Liquid Membrane
Liquid membranes are applied directly to the prepared substrate and cure into a continuous waterproofing layer.
Advantages:
- Convenient around irregular shapes
- Easy to work around complicated transitions
- No sheet seams across large flat areas
Disadvantages:
- Application thickness must be controlled
- Insufficient coverage can create weak areas
- Curing requirements must be followed
For a curbless shower, I would choose the system that the installer knows how to detail correctly—not simply the product with the most impressive marketing claims.
What Is the Best Approach for a Wood-Framed Curbless Shower?
This deserves separate attention because many American homes use wood-framed floors.
The challenge is creating enough depth for the shower slope while maintaining a practical finished floor height.
Depending on the construction, a curbless shower may require a recessed shower area, a specifically designed shower pan, a low-profile system, or another engineered approach.
Do not cut or notch structural framing simply to make a shower floor fit.
Modifying joists or other structural components without an appropriate design can compromise the building structure.
If the existing floor cannot accommodate the required slope and waterproofing assembly, the correct solution may involve structural modifications rather than simply reducing the thickness of the waterproofing or mortar.
Curbless Shower Waterproofing for Different Bathroom Situations
| Bathroom Situation | Recommended Approach | Main Concern |
|---|---|---|
| New construction | Plan structure, drain and waterproofing together | Floor elevation |
| Second-floor wood-framed bathroom | Complete waterproofing + structural floor planning | Deflection and recessed floor |
| Concrete slab bathroom | Complete membrane and drain system | Drain elevation and slope |
| Small curbless shower | Compact drain and continuous membrane | Containing spray and splash |
| Large walk-in shower | Full wet-area waterproofing | Extended water exposure |
| Wet-room bathroom | Continuous waterproofing across floor and walls | Entire room exposure |
Do You Need to Waterproof the Entire Bathroom Floor?
Not every curbless shower automatically requires the entire bathroom to be waterproofed identically to the shower area.
However, the closer the bathroom comes to a true wet room, the more important continuous floor waterproofing becomes.
For a standard curbless shower with a defined wet area, the waterproofing design should extend far enough to protect the shower assembly and properly detail the transition into the bathroom.
For a wet-room design where water is expected across a substantial portion of the bathroom floor, treating the entire wet area as one continuous waterproofed assembly is generally a more appropriate strategy.
Do not confuse “water-resistant flooring” with a waterproof shower assembly.
How to Test a Curbless Shower Before Installing Tile
Testing before the finished tile is installed is one of the most valuable steps in a shower renovation.
The exact testing method and duration should follow applicable local requirements and the waterproofing system manufacturer’s instructions.
A typical testing process involves temporarily sealing the drain and maintaining a controlled amount of water in the shower area while checking for leakage.
Inspect the area below and around the shower for signs of water escape.
For a second-floor bathroom, this step is particularly valuable because discovering a leak after the tile and glass enclosure are installed can turn a relatively simple repair into a much larger demolition project.
Never skip required testing simply because the membrane looks perfectly installed.
Common Curbless Shower Waterproofing Mistakes
1. Treating the Shower Entrance Like a Normal Floor Transition
The curbless entrance is part of the waterproofing strategy, not merely a visual transition.
2. Installing the Drain Too Late
The drain location affects slope, tile layout, and waterproofing details. Plan it before building the shower floor.
3. Using Waterproof Paint as the Primary System
A generic waterproof coating is not automatically equivalent to a tested shower waterproofing system.
4. Ignoring the Subfloor
A membrane cannot repair a structurally inadequate or excessively flexible floor.
5. Forgetting Penetrations
Shower controls, glass hardware, grab bars, and accessories can all create waterproofing penetrations.
6. Mixing Unrelated Waterproofing Components
Use compatible components whenever possible and follow the system manufacturer’s installation requirements.
7. Installing Tile Before Testing
If the system requires a flood test or other verification before covering, perform it before the finished tile hides the waterproofing layer.
How Much Does a Curbless Shower Waterproofing System Cost?
Curbless showers generally require more planning and labor than basic shower installations, so waterproofing costs can vary significantly.
| Project Type | Relative Cost | Installation Complexity | Typical Challenge |
|---|---|---|---|
| Basic waterproofing upgrade | $$ | Moderate | Transition detailing |
| Standard curbless shower | $$–$$$ | High | Slope and drain integration |
| Wood-framed curbless shower | $$–$$$ | High | Floor elevation and structure |
| Large walk-in shower | $$$ | High | Large waterproofed area |
| Full wet room | $$$–$$$$ | Very High | Continuous room-wide waterproofing |
These are relative categories rather than fixed U.S. installation prices. Labor rates, shower size, drain type, tile, structural modifications, and existing floor conditions can change the final project cost substantially.
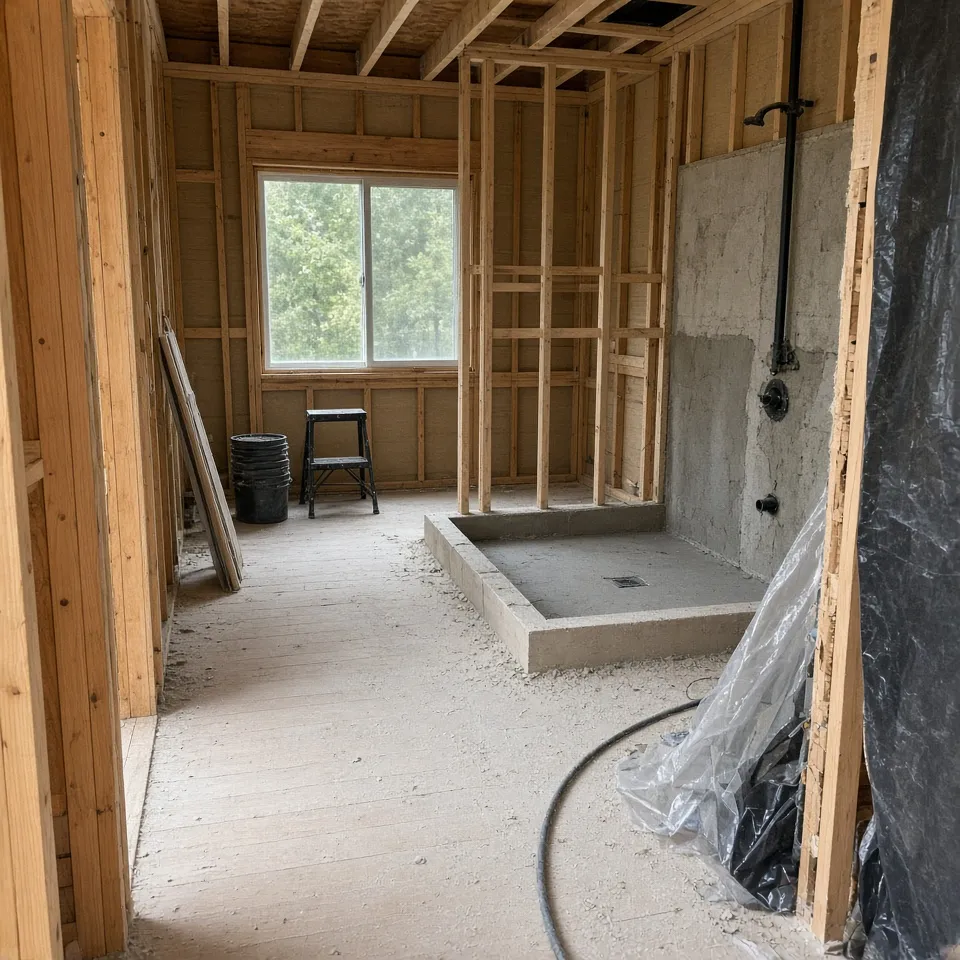
A Real-World Example: Second-Floor Curbless Shower
Imagine remodeling a second-floor bathroom in a wood-framed home.
The homeowner wants a modern curbless shower with a linear drain and large-format porcelain tile.
The first instinct might be to install a low-profile shower pan and start tiling.
But before doing that, I would determine the existing floor elevation, joist layout, available depth, drain location, and required shower slope.
Then I would select a compatible waterproofing and drain system and determine how the waterproofing will transition from the shower floor into the bathroom floor.
If the floor does not have enough depth for the required slope, the problem needs to be solved before waterproofing begins.
This is the important lesson: a curbless shower is designed from the structure upward, not from the tile downward.
My Practical Curbless Shower Waterproofing Checklist
- Inspect the existing floor structure.
- Confirm the finished floor elevations.
- Determine how the shower slope will be created.
- Choose the drain before constructing the shower floor.
- Select one compatible waterproofing system.
- Waterproof the shower floor continuously.
- Waterproof the shower walls.
- Detail all corners and changes of plane.
- Seal plumbing and fixture penetrations according to the system.
- Integrate the membrane with the drain.
- Pay special attention to the curbless entrance.
- Protect the waterproofing during subsequent work.
- Complete required water testing before installing the finished tile.
Frequently Asked Questions
What is the best waterproofing membrane for a curbless shower?
There is no single membrane that is universally best. A properly installed sheet membrane, liquid-applied membrane, or compatible waterproof shower system can work. The critical factors are system compatibility, correct detailing, drainage, substrate preparation, and installation quality.
Should a curbless shower be waterproofed differently from a regular shower?
The fundamental waterproofing principles are similar, but a curbless shower requires more attention to the floor transition because there is no raised curb to contain water. The drain, slope, waterproofing, and bathroom-floor transition need to be planned together.
Is a linear drain better for a curbless shower?
A linear drain can be particularly convenient for many curbless designs because it can allow a predominantly single-direction floor slope. However, a properly designed center drain can also work. The best choice depends on the shower dimensions, tile, floor structure, and waterproofing system.
How much slope does a curbless shower floor need?
A commonly used planning value is approximately 1/4 inch per foot of fall, but the applicable requirement depends on the shower design, local requirements, drain configuration, and manufacturer’s instructions. The slope should be established before the finished floor is installed.
Can you install a curbless shower over a wood floor?
Yes, curbless showers can be installed in wood-framed homes, but the floor structure and available depth must be carefully evaluated. The shower needs adequate support, appropriate slope, compatible waterproofing, and a properly integrated drain. Structural framing should never be modified casually to create floor recesses.
Conclusion
The best waterproofing approach for a curbless shower is a complete, continuous system that combines waterproofing, drainage, floor slope, substrate support, and carefully detailed transitions.
A sheet membrane, liquid membrane, or compatible waterproof shower board can all be effective when installed correctly. The product itself is only one part of the system.
For a curbless shower, I would pay particular attention to four areas: the shower entrance, drain connection, floor slope, and structural floor assembly. These details determine whether the shower simply looks good on installation day or continues to perform properly after years of daily use.
If the bathroom is wood-framed, solve the floor elevation and structural questions before waterproofing. If the shower uses a linear drain or large-format tile, plan those components before the floor assembly is built.
A curbless shower should be designed from the structure and drainage system upward—not from the finished tile downward.
If you are planning a shower renovation or dealing with leaks, failed membranes, or moisture problems, see the Bathroom Waterproofing category for practical waterproofing guides and repair information.