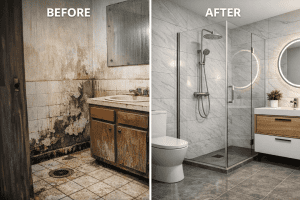
A shower niche is one of the most useful features you can add to a tiled shower. It gives you a convenient place for shampoo, soap, and other shower products without taking up floor space.
But a recessed niche also creates more corners, seams, transitions, and potential penetrations in the shower wall. That makes waterproofing especially important.
If a niche is waterproofed correctly before tile is installed, the tile becomes part of a properly designed wet-area assembly. If the waterproofing is skipped or poorly connected, the finished tile can look perfect while moisture slowly reaches the wall framing behind it.
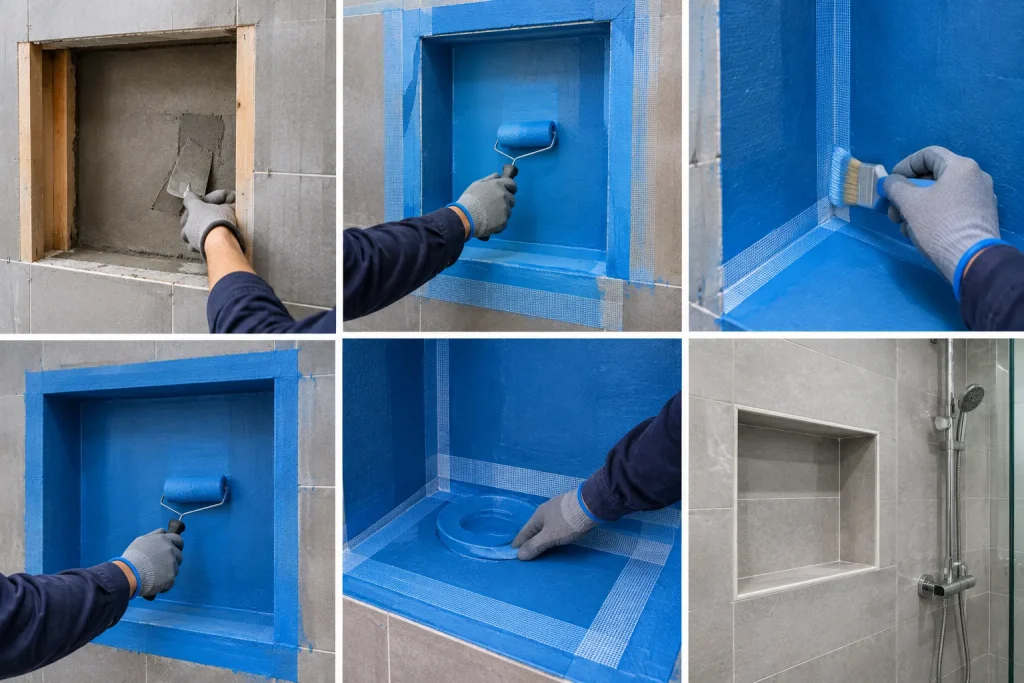
The key principle is simple: the waterproofing must protect the entire niche, including the back, side walls, top, bottom, corners, and connection to the surrounding shower waterproofing system.
Quick Answer: How Do You Waterproof a Shower Niche?
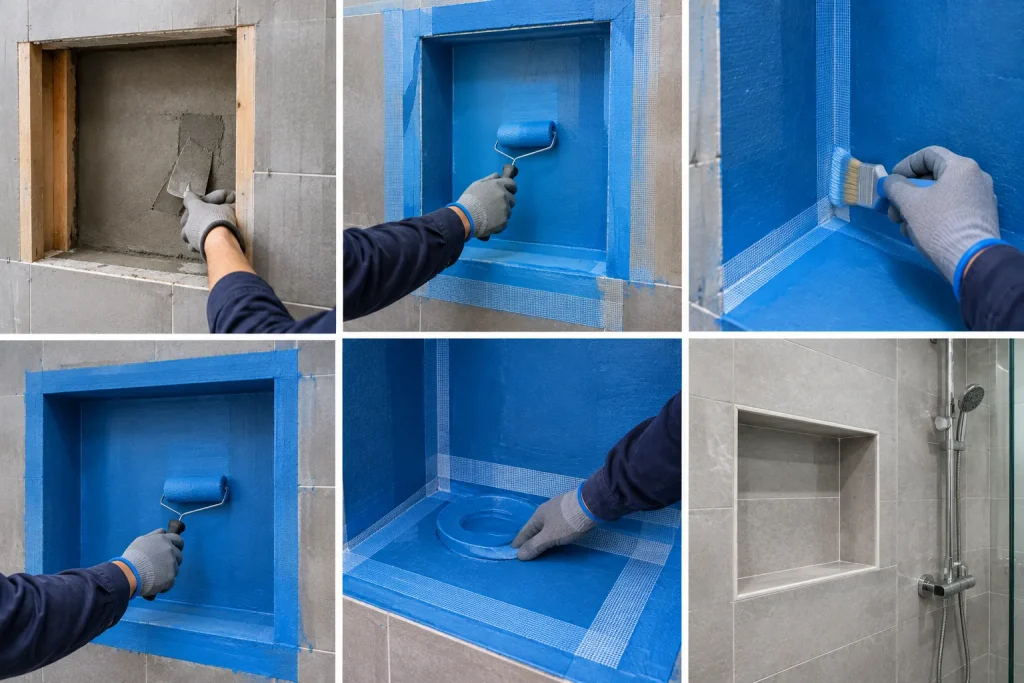
The safest approach is to waterproof the niche as part of the same continuous shower waterproofing system used on the surrounding walls.
Depending on the construction method, that may involve a compatible sheet membrane, liquid-applied waterproofing membrane, waterproof foam niche, or another manufacturer-approved waterproofing assembly.
The basic sequence is:
- Build the niche with a suitable wet-area substrate.
- Make sure all surfaces are properly supported and correctly shaped.
- Seal every inside corner and joint.
- Waterproof the niche surfaces completely.
- Connect the niche waterproofing to the surrounding wall waterproofing.
- Seal fasteners and penetrations according to the waterproofing system instructions.
- Inspect the complete niche before installing tile.
Do not install tile first and hope the grout will make the niche waterproof. Tile and grout are the visible finish; the waterproofing layer beneath them is what manages moisture entering the wall assembly.
Why Is Shower Niche Waterproofing So Important?
A shower niche receives direct water exposure every time the shower is used. Water can collect on the bottom shelf, run down the side walls, and remain in the corners longer than it does on a flat shower wall.
The niche also creates several transitions that do not exist on an uninterrupted wall.
For example, a typical recessed niche has:
- Four inside corners
- A back wall
- Two side walls
- A top surface
- A bottom shelf
- A perimeter connection to the surrounding wall
Every transition needs to be integrated into the waterproofing system.
Modern bonded waterproofing systems commonly use sheet membranes or liquid-applied membranes beneath tile. ANSI A118.10 establishes performance criteria for bonded waterproof membranes intended to resist liquid water migration, but the complete shower assembly still needs to be constructed according to the applicable system and installation method.
What Should Be Waterproofed Inside a Shower Niche?
| Niche Area | Why It Matters | What to Check |
|---|---|---|
| Back wall | Directly exposed to splash water | Continuous waterproofing coverage |
| Top surface | Can collect and direct water into corners | Complete membrane coverage and sealed joints |
| Bottom shelf | Receives standing and flowing water | Waterproofing plus appropriate slope |
| Side walls | Create multiple inside corners | Corner treatment and membrane continuity |
| Inside corners | Common locations for movement and installation errors | Proper corner sealing |
| Perimeter flange or frame | Connects niche to surrounding wall | Watertight transition to wall membrane |
| Fasteners | Can penetrate the waterproofing layer | Approved sealing method |
Step 1: Choose a Waterproof Niche Construction Method
Before waterproofing, decide which niche system you are building.
There are several approaches used in residential shower construction.
Built-In Niche With Waterproof Membrane
This approach uses a suitable tile backer or waterproof board to construct the niche and then covers the assembly with a compatible waterproofing membrane.
The advantage is flexibility. You can build a niche to suit a particular tile layout or shower-wall dimension.
The disadvantage is that there are more joints and details that must be waterproofed correctly.
Prefabricated Waterproof Foam Niche
A prefabricated foam niche is manufactured to integrate with a particular waterproofing system. Some products are supplied with waterproof corner or perimeter components that simplify the connection to the surrounding membrane.
For example, Schluter’s KERDI-BOARD-SN is designed as a prefabricated waterproof niche and uses a KERDI-BAND frame to seal the connection between the niche and surrounding waterproofing.
This type of system can reduce the number of custom waterproofing details that have to be built on site.
Prefabricated Metal or Finished Niche
Another option is a factory-made niche that is already designed as a waterproof component.
Some current products use powder-coated aluminum or other finished materials and are installed as a complete waterproof niche rather than being tiled internally. For example, Schluter’s current DESIGN-NICHE is designed to integrate with its waterproofing system and uses a sealing frame around the perimeter.
This can be attractive for homeowners who want less grout inside the niche.
Step 2: Make Sure the Niche Is Properly Supported
Waterproofing cannot compensate for an unstable structure.
The niche should be properly supported by the surrounding wall framing or the support method specified by the manufacturer.
This becomes particularly important for larger niches. A wide opening can remove part of the original wall support, so the framing needs to be designed accordingly.
When installing a prefabricated niche, follow the manufacturer’s fastening requirements rather than improvising screw locations.
For example, Schluter specifies that its KERDI-BOARD-SN niche should be supported on both sides by studs or other wall framing, with specified fastener placement and spacing.
Step 3: Check the Bottom of the Niche Before Waterproofing
The bottom shelf deserves special attention because shower products and water can sit there for longer periods.
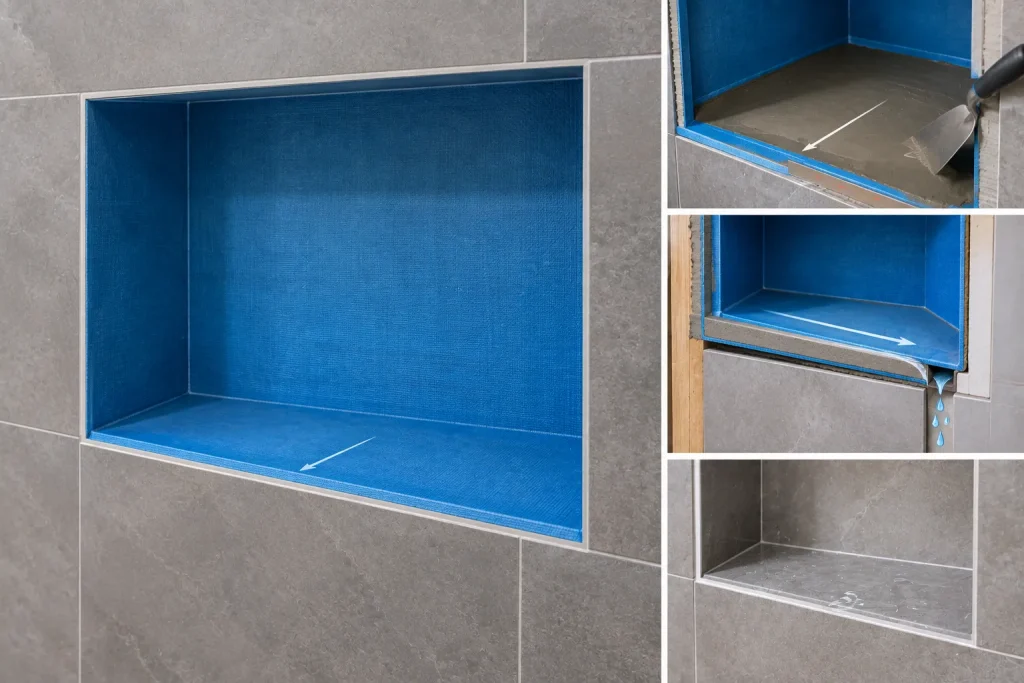
The shelf should be designed so water does not simply remain pooled inside the niche.
A slight drainage slope toward the shower area is commonly used, but the exact slope and construction should follow the waterproofing and tile system being installed.
A shelf that looks perfectly level may actually hold a small amount of water against the rear corner after every shower.
That may not cause an immediate leak, but it creates a consistently wet condition that is less desirable than allowing water to drain naturally.
Step 4: Waterproof the Entire Niche
Once the structure is ready, waterproof the entire interior of the niche.
Do not waterproof only the back wall and assume the other surfaces will be protected by the surrounding shower membrane.
The top, bottom, side walls, back, and corners should form one continuous waterproofed area.
With a sheet membrane system, the membrane must be properly bonded and embedded according to the manufacturer’s instructions. Air pockets, incomplete adhesion, or improperly sealed overlaps can compromise the installation.
With a liquid-applied membrane, the product must be applied at the manufacturer’s required thickness and coverage. One of the common mistakes with liquid products is applying a thin coat that appears complete but does not meet the specified coverage.
Waterproofing is not just about covering the surface. It is about creating a continuous water-resistant assembly.
Step 5: Pay Special Attention to the Inside Corners
Inside corners are some of the most important details in a shower niche.
You cannot simply paint or spread membrane across a corner and assume that the transition is finished. The waterproofing system needs to accommodate the geometry of the corner and create a reliable connection between adjacent surfaces.
Depending on the system, this can involve preformed corners, membrane strips, reinforcing fabric, or manufacturer-approved sealants and accessories.
Do not mix random products from different waterproofing systems unless the manufacturers specifically approve that combination.
Step 6: Seal the Niche-to-Wall Connection
This is one of the most important steps.
The niche itself may be waterproof, but the installation can still leak if the perimeter where the niche meets the surrounding wall is not properly connected.
The niche waterproofing should overlap, bond, or otherwise connect with the wall waterproofing according to the selected system.
For example, Schluter’s niche installation instructions specify using a KERDI-BAND frame to make the connection between the prefabricated niche and surrounding KERDI-BOARD or membrane.
The important principle applies regardless of brand: the niche cannot be treated as an isolated waterproof box inside a waterproof wall. The two systems need a continuous connection.
Step 7: Seal Fasteners and Penetrations
Every screw, fastener, bracket, or other penetration through the waterproofing layer deserves attention.
A common installation mistake is to waterproof a niche carefully and then create new unsealed penetrations while installing shelves, trim, accessories, or framing.
Before making any penetration, determine whether it is actually necessary.
When a penetration is required, use the sealing method approved for that waterproofing system. Do not assume that ordinary silicone, construction adhesive, or caulk is automatically an acceptable substitute.
Step 8: Let Liquid Waterproofing Cure Properly
If a liquid-applied membrane is being used, do not rush directly into tiling because the surface looks dry.
Liquid waterproofing products have manufacturer-specific curing and drying requirements. Temperature, humidity, substrate conditions, and membrane thickness can affect the process.
Follow the product’s current technical data rather than relying on a generic drying time from another product.
This is particularly important inside a niche because corners and transitions can retain moisture longer than large, open wall surfaces.
Step 9: Inspect the Niche Before Installing Tile
This is the point where it is worth slowing down.
Before covering the waterproofing with tile, inspect the entire niche.
Look for:
- Unsealed inside corners
- Gaps between membrane sections
- Loose or poorly bonded membrane
- Visible punctures
- Unsealed fastener locations
- Incomplete coverage near the perimeter
- Damage caused by later construction work
- Areas where the waterproofing system does not connect continuously to the main wall
Repair defects before tile is installed. Once the tile is covering the waterproofing layer, correcting an overlooked detail becomes much more disruptive.
Sheet Membrane vs Liquid Waterproofing for a Shower Niche
| Feature | Sheet Membrane | Liquid-Applied Membrane |
|---|---|---|
| Application | Membrane sheets are bonded to the substrate | Membrane is applied directly as a coating |
| Corner treatment | Uses formed corners or membrane detailing | Uses the product’s specified reinforcing and coating method |
| Thickness control | Factory-produced membrane thickness | Depends on correct application thickness |
| Custom shapes | Can be cut and formed | Convenient for irregular surfaces |
| Main installation concern | Proper bonding and seam treatment | Correct coverage, thickness, and curing |
| Best approach | Use as part of a complete compatible system | Use according to the product’s complete installation requirements |
Neither method is automatically better for every project. The most important factor is using a complete, compatible system and following its installation requirements.
Common Shower Niche Waterproofing Mistakes
Mistake 1: Treating Tile and Grout as the Waterproofing
This is probably the most important misconception to avoid.
Tile and grout provide the finished surface, but they should not be treated as the primary waterproofing layer of a shower assembly. A properly designed shower relies on the waterproofing system behind or beneath the tile to manage water that gets past the finished surface.
Mistake 2: Waterproofing the Back but Not the Edges
A niche is a three-dimensional box, not a flat wall.
Waterproofing only the back panel leaves the side walls, top, bottom, and perimeter vulnerable.
Mistake 3: Forgetting the Niche Perimeter
Even a factory-made waterproof niche needs a properly sealed connection to the surrounding wall system.
This transition is one of the details that should be inspected before tile installation.
Mistake 4: Using Random Sealants
Different waterproofing systems specify different adhesives, mortars, sealants, primers, and accessories.
Using an unrelated product because it “looks waterproof” can create compatibility problems.
Mistake 5: Installing Shelves With Unnecessary Penetrations
If a shelf can be bonded without creating a new penetration through the waterproofing layer, that may be preferable. When penetrations are necessary, they need to be treated according to the waterproofing system requirements.
Mistake 6: Covering the Waterproofing Too Quickly
Liquid-applied systems need the specified drying or curing process. Rushing into tile installation can trap an incompletely cured membrane beneath the finish.
Should the Niche Be Waterproofed Before or After the Main Shower Walls?
The exact sequence depends on the waterproofing system and how the niche is constructed.
What matters is not whether the niche is technically waterproofed first or second. What matters is that the final assembly creates a continuous waterproof connection between the niche and the surrounding shower walls.
For prefabricated systems, follow the manufacturer’s stated sequence. Schluter’s current niche instructions, for example, specifically address how the niche connects to adjacent KERDI-BOARD or KERDI membrane assemblies.
How Much Does It Cost to Waterproof a Shower Niche?
| Project Type | Cost Consideration | Difficulty |
|---|---|---|
| Simple waterproof membrane detail on a small niche | Lower material and labor requirement | Moderate |
| Custom built-in niche | More framing, substrate, waterproofing, and tile detailing | High |
| Prefabricated waterproof niche | Higher component cost but potentially simpler installation | Moderate |
| Repairing a failed niche after tile installation | Potentially much higher because tile and surrounding finishes may need removal | High |
Actual project costs vary significantly with local labor rates, shower size, tile material, wall construction, niche dimensions, and whether the work is part of a larger bathroom renovation.
How to Choose the Best Waterproofing Method for Your Shower Niche
| Your Situation | Practical Choice |
|---|---|
| DIY homeowner with limited tile experience | A complete prefabricated niche system can reduce custom detailing |
| Custom luxury bathroom | A properly detailed built-in niche offers more design flexibility |
| Fast renovation schedule | Consider a prefabricated waterproof niche system |
| Large recessed niche | Pay particular attention to framing and structural support |
| Curved or unusual niche shape | Use a waterproofing method approved for the specific substrate and geometry |
| Steam shower | Evaluate vapor-control requirements in addition to liquid waterproofing |
Steam showers deserve additional consideration because liquid-water resistance and vapor control are not exactly the same thing. ANSI A118.10 addresses bonded waterproof membranes for liquid-water migration, while vapor permeance is evaluated separately.
Real-World Example: A Niche That Looks Perfect but Leaks
Imagine a homeowner who has a beautifully tiled shower niche. The grout lines are straight, the shelf looks level, and there is no visible crack.
Several months later, paint on the opposite side of the shower wall begins to discolor.
The visible tile does not necessarily reveal the problem. The failure could be behind the tile where the waterproofing was never properly connected around the niche opening.
This is why waterproofing should be inspected before tile installation. Once the finished surface is covering the entire assembly, the most important layer is no longer visible.
Real-World Example: A Bottom Shelf That Never Fully Dries
Another common situation is a niche that is completely waterproof but has a shelf that holds a thin layer of water after every shower.
The waterproofing itself may be functioning correctly, but the shelf geometry is not helping water drain away.
Over time, bottles sit in the standing water, soap residue accumulates, and cleaning becomes more difficult.
A properly designed bottom shelf should not be treated as a decorative horizontal ledge. It is part of the wet-area water-management detail.
Can You Waterproof a Shower Niche Yourself?
Yes, an experienced DIY homeowner can waterproof a shower niche, but this is one part of a shower installation where careful system selection matters.
The biggest DIY mistake is combining instructions from several different products.
For example, a homeowner may use one manufacturer’s waterproofing board, another manufacturer’s membrane, a generic sealant, and a third manufacturer’s corner accessory. Each product may individually be waterproof, but that does not automatically mean the combined assembly has been tested or approved.
A complete compatible system is usually a better approach than assembling waterproofing components at random.
Frequently Asked Questions
Do I need to waterproof a shower niche before tiling it?
Yes. A recessed shower niche should be integrated into the shower’s waterproofing system before tile is installed. Tile and grout should not be relied upon as the primary waterproofing layer.
What is the best waterproofing method for a shower niche?
There is no single method that is best for every project. A properly installed sheet membrane, liquid-applied system, or compatible prefabricated waterproof niche can all work when installed according to the complete system requirements.
Should a shower niche bottom be sloped?
A slight slope toward the shower area is commonly used so water does not sit on the shelf. The exact slope and construction should follow the tile and waterproofing system being used.
Can I use silicone caulk to waterproof a shower niche?
Silicone or another sealant may be specified for particular joints in some systems, but it should not be treated as a substitute for the complete waterproofing membrane. Use only the sealants and adhesives approved for the waterproofing system.
How do I know if my shower niche is waterproof before tiling?
Inspect the entire waterproofed assembly before covering it. Look closely at corners, seams, penetrations, the niche perimeter, and the connection between the niche and surrounding wall membrane. Liquid-applied products should also meet the manufacturer’s required thickness and curing conditions.
Conclusion
A shower niche adds useful storage, but it also adds several high-risk waterproofing details to a tiled shower.
The most important thing to remember is that the niche should be waterproofed as part of the complete shower wall assembly. The back, top, bottom, side walls, corners, fastener locations, and perimeter connection all need to work together as one continuous water-management system.
Do not let attractive tile hide an incomplete waterproofing job. Take the time to inspect the niche before the first tile is installed. Correcting a missed seam or corner at this stage is far easier than removing finished tile after moisture has reached the wall assembly.
For most homeowners, the safest approach is to select one compatible waterproofing system, follow its current manufacturer instructions carefully, and treat the niche as a critical part of the shower waterproofing rather than as a simple storage box.
For more expert resources, explore our Bathroom Waterproofing category, where we cover materials, repair methods, and prevention strategies in depth.